XNA Essentials

Game Programming for Xbox 360, PC + Windows Phone

NAVIGATION - SEARCH

Creating a Selection Wheel in XNA

This tutorial will describe the process where you create a selection wheel to be used with a Gamepad controller.  This will allow you to create conversation wheels, power wheels, weapon wheels, command wheels, etc in your games.

Note this demo requires a Gamepad, so you will either need to have one hooked up to Windows or run this on the Xbox 360 (which requires an AppHub membership).

Games such as Mass Effect, Assassins Creed and Dragon Age all use selection wheels. I thought it was extremely clever the first time I saw it used in a game and I definitely enjoy games that utilize it.

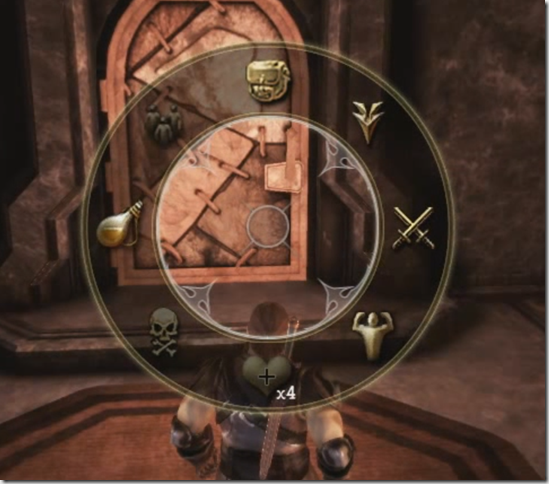
Here is an example of a selection wheel inside of BioWare’s Dragon Age: Origins:
image

The wheel is populated with all of the valid choices but items that can’t be selected are dimmed.  From this wheel the player can select items which can either select that item or bring up new selections in the wheel.  For example, if the user selected the health item at the bottom (assuming it was enabled because the character was in combat) then it would immediately apply the health potion to the character and the wheel would disappear.  However, if the user selected the Potions selection on the left the items in the wheel would be replaced by the available potions the user had.  For Dragon Age, the gamer brings up this wheel by holding down the Left Trigger.

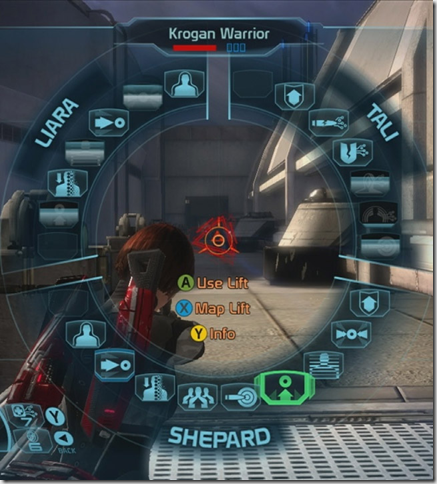
Here is an example of a command wheel in BioWare’s  Mass Effect:
image


This is a wheel that has a lot more options but the premise is the same.  Move the Gamepad controller around the edges to select the item.  In this case there is no “drill down” option and any selection is a final selection and the wheel closes. The gamer brings up this wheel by hitting the Right Bumper (RB) button.

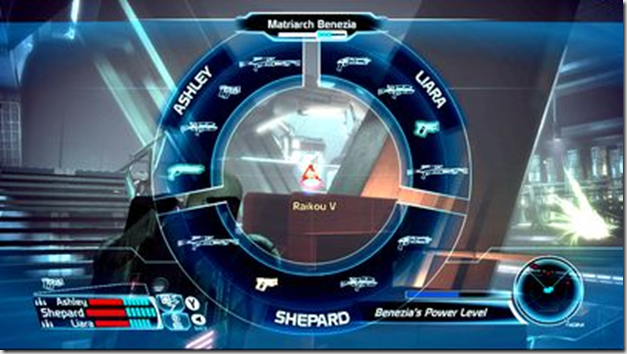
If the user presses the Left Bumper (LB) button then Mass Effect’s weapon wheel is brought up:
image

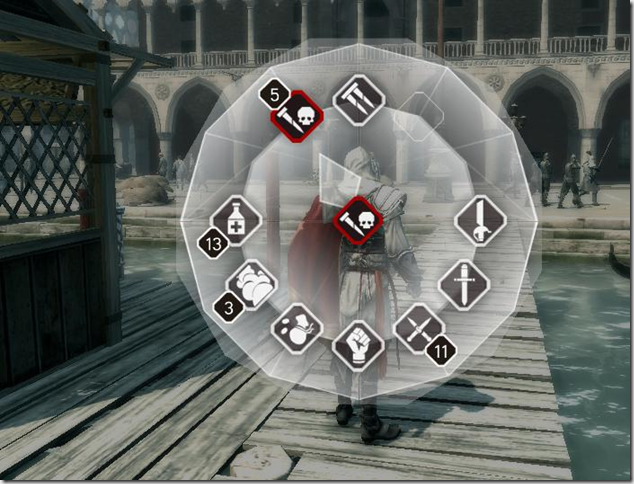
Another example is one from Ubisoft’s Assassin’s Creed.  The example I’m showing here is from Assassin’s Creed 2:
image

When an item isn’t available, they just hide that item from the wheel altogether (instead of showing a disabled icon).  This also simply selects what is desired and closes the wheel.

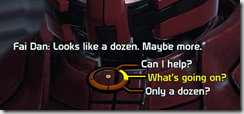
The final examples I will show are the conversation wheels from BioWare’s Dragon Age 2 and Mass Effect:

imageimage

In these images only three items on the right are available.  When more conversation items are available they will show up on the left.  The point here is that you can utilize the same input mechanics in a wide variety of games.  I’ll attempt to explain how you can do so.

Let’s get to it already!

The example code I’ll be showing today doesn’t take into consideration any selection / disabled / non-visible items but it would be pretty easy to add that in.  Instead it focuses on the code to map the Left Thumb Stick’s X and Y coordinates to the selection wheel.  It will show how to convert the X and Y values from the thumbstick to an angle and then utilize that angle to point to the different items in our wheel.  The current item that is pointed to will be displayed beside the wheel. 

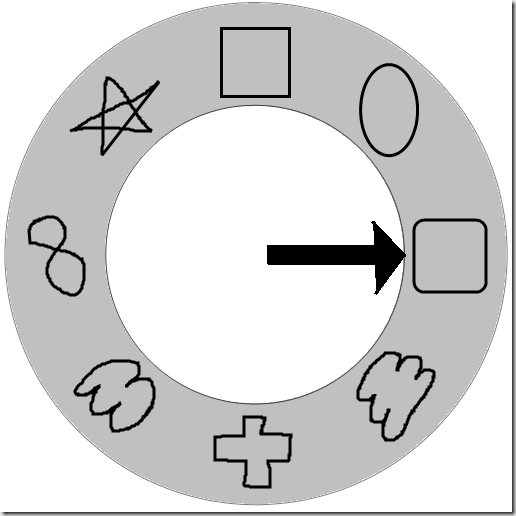
To start out I create the actual wheel in Paint.NET. 
image

And this is why I am a software engineer and not a graphic designer.

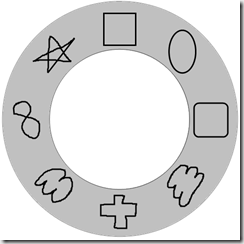
The download at the bottom includes the actual wheel.pdn (Paint .NET file) with the different layers.  The actual content project will use two different files created from this original artwork.  The first is the selection wheel itself (selection.png).  The second is the arrow (selector.png).
imageimage

Note for the blog, these have white backgrounds but in the download they are transparent. So make sure you grab the files from there and not by saving these images.

After creating the artwork I then started on the code (which was much easier I must say).  A real artist would have had no problem lining up the inner circle to the outer circle but I struggled and still am not confident it is perfectly centered. Ah to really know the tools you use is beneficial and I don’t know any image editing software very well.

So create a new Windows or Xbox 360 Game project in Visual Studio.  I called mine SelectionWheel.  Inside of the Content Project (i.e. SelectionWheelContent) add the artwork selection.png and selector.png.  Also add in a new SpriteFont called font.  (Right click on SelectionWheelContent and select Add New Item then select Sprite Font from the list. and change the name from spritefont1 to font)

Open up the font xml file (font.spritefont) and change the size to 32.  That is all of the content we need for this tutorial.

Now open up the Game1.cs file and add the following member fields to the class:

Texture2D selection;
Texture2D selector;
SpriteFont font;

Now we are going to add the integer values we will be selecting on the wheel. Add the following constants to the class:

const int ROUNDED = 0; //start with the selection on the right first 
const int ELIPSE = 1; //work your way counter-clockwise 
const int SQUARE = 2;
const int STAR = 3;
const int INFINITY = 4;
const int ABSTRACT = 5;
const int PLUS = 6;
const int CLOUD = 7;

We could modify this to have more items on the wheel.  Currently this is only 8 items for the main 8 directions of the thumbstick but we could add several more items and modify the math we will see a little later to accommodate the additional items. Notice how we start numbering them with the item on the right first.  The math involved starts with angle value of 0 on right. As you move counter-clockwise (moving up and to the left the radians / angle increases).  We will talk more about this a little later.

Next we need to create a member field to store the list of selections.  In this case we are just storing strings of the selection, but this could be any kind of object you desire. We will also add in a variable to store our radians and index of our selection.

Dictionary<int, string> selections = new Dictionary<int, string>();
float radians = 0;
int index;

Let’s initialize those selections by adding a new method InitializeSelections that we will call from the Initialize method in the game class:

void InitializeSelections()
{
    selections = new Dictionary<int, string>();
    selections.Add(ROUNDED, "ROUNDED");
    selections.Add(ELIPSE, "ELIPSE");
    selections.Add(SQUARE, "SQUARE");
    selections.Add(STAR, "STAR");
    selections.Add(INFINITY, "INFINITY");
    selections.Add(ABSTRACT, "ABSTRACT");
    selections.Add(PLUS, "PLUS");
    selections.Add(CLOUD, "CLOUD");

    index = 0; // default to selecting the value on the right (ROUNDED)
}

Inside of our Game1 constructor we can set the preferred backbuffer width and height if we want.  My setup supports 1920x1080 so that is what I’m setting.  The XNA Framework will select the highest resolution supported by the output device if the resolution asked for isn’t supported.

//Will be scaled down if not supported
graphics.PreferredBackBufferWidth = 1920;
graphics.PreferredBackBufferHeight = 1080;

graphics.ApplyChanges();

Next we can actually load the content we created by adding the following code in the LoadContent method:

selection = Content.Load<Texture2D>("selection");
selector = Content.Load<Texture2D>("selector");

font = Content.Load<SpriteFont>("font");

We will save the Update method for the last since that is where the bulk of our work will be done.  For now, let’s add the following code to our Draw method which will draw the actual selection wheel,

spriteBatch.Begin();
spriteBatch.DrawString(font, selections[index], new Vector2(530, 0), Color.Red);
spriteBatch.Draw(selection, new Rectangle(0, 0, 512, 512), Color.White);
spriteBatch.Draw(selector, new Rectangle(256, 256, 512, 512), null, Color.White,
                        -radians, new Vector2(256,256), SpriteEffects.None, 0);
spriteBatch.End();

The selection is being drawn based on the current index selected (initialized to 0).  The selection wheel is drawn and the selector is drawn right on top of it. The selector is being rotated by the negative radians amount.  The radians value will be populated in the Update method next.  It is being drawn offset so it will be in the center of the selection wheel and the origin of the selector was set to half of the texture size (256,256) so it would rotate around the middle. The selector image could be trimmed and these values modified to save some room but for this example I wanted to keep it clear as to how it is working.

Now we get to the real part of the tutorial.  Here comes the big complicated math to make this work.  It really isn’t complicated or I wouldn’t be able to do it – so don’t worry!

Inside of the Update method let’s grab the state of our Gamepad:

GamePadState gp = GamePad.GetState(PlayerIndex.One);

// Allows the game to exit
if (gp.Buttons.Back == ButtonState.Pressed || Keyboard.GetState().IsKeyDown(Keys.Escape))
    this.Exit();

The above code should replace the existing GamePad.GetState condition in the Update method.

Next we need to calculate the index we are currently pointing to so the arrow.  In order to determine the index we first need to convert our Thumbstick’s X and Y values (which go from -1.0 to 1.0) to an angle value in radians.  Let’s start off calculating the radian value and then work our way up to determining the index.

//Get radians from thumbstick
if (gp.ThumbSticks.Left.Y != 0 || gp.ThumbSticks.Left.X != 0)
    radians = (float)(Math.Atan2(gp.ThumbSticks.Left.Y, gp.ThumbSticks.Left.X));

First, we only want to change our radians value if the thumstick is off center.  If it is centered, but the X and Y values will return 0.  Assuming the stick is actually being pushed in a particular direction we want to determine the angle.  The MathHelper.Atan2 method is extremely helpful.  This is why I love the XNA Framework. There is no need to write code for the trigonometry behind this calculation we can simply use it.  A good explanation of the Atan2 function can be found in the AppHub’s educational catalog.  The Aiming example has a TurnToFace method which actually includes a diagram in source code :)  The help for the Atan2 method is also helpful: http://msdn.microsoft.com/en-us/library/system.math.atan2.aspx

At this point we have our angle value (in radians).  You can totally just work with radians but most people (myself included) find it easier to work in degrees.  As a bonus, I’ll show how to work with radians at the end.  For now, to get the angle in degrees we need to add the following code to our Update method:

//convert to angle from radians to degrees
float degrees = radians * 180.0f / (float)Math.PI;

//changes -90 to 270
if (degrees < 0) //Atan2 returns negative for quadrant 3 and 4 
    degrees += 360; //so make it positive by adding 360 to it (get values 270-360); 

To convert from radians to degrees we only need to multiply the radians value by 180 and then divide that by Pi (~3.14).  Atan2 returns negative values for quadrant 3 and 4. So basically 181-359 degrees comes out as -180 to -1. (Atan2 returns values from -Pi to Pi to give you a full circle basically  -180 to 0 to 180 instead of 0 to 360).

We check to see if our degrees value is less than 0 and if so we add 360 to it.  This converts -179.99 to 180.01 and  -90 to 270 and -0.01 to 359.99. So we get a full 0 to 359.999 degrees in our circle.

Now that we have a value in degrees we need to convert that to an index so we can determine which value in our list of selections is actually selected.  The selection item is simply a string but it could be desired to store another type of object complete with its own properties and methods. This object could contain a flag as to if it was enabled and/or visible. It could contain an image that would be displayed on the wheel instead of a static wheel like we currently have. For now, we are keeping the tutorial simple and are just storing a string value.

Assuming our indices match up to our selections we can add the following code to our Update method:

index = (int)((degrees + 22.5f) / 45);

So there are two things happening here.  The first is we are dividing by 45 degrees.  This is because we have 8 items in our wheel.  8 goes into 360 45 times.  So each item takes up 45 degrees of the wheel.  This is all we would need if the selection of the first item (on the right) started at position 0.  However, position 0 is right in the middle of the first selection (ROUNDED in our case).  So in order to offset our angle we are adding an offset of 22.5 degrees before dividing by our 45 degrees.  22.5 is half of 45.  Since 0 splits the ROUNDED item in half, we want half. 

We could make this a little more dynamic if we wanted to.  Let’s say we had 12 items in our list instead of 8.  Assuming we added the constants and the new strings to our list and updated our image as well we could have the following code:

float itemDegree = 360.0f/selections.Count;
float offset = itemDegree / 2.0f;
index = (int)((degrees + offset) / itemDegree);

So we determine how many degrees an item takes up (itemDegree) by dividing 360 by the number of selections we have (8, 12, etc). We then determine the offset (assuming we always start with index 0 is on the right) by dividing the number of degrees and item takes up (itemDegree) in half.  We then plug in the itemDegree and offset into the same formula above where we hard coded the values.  So this would be beneficial if you are reusing the selection wheel in your code for let’s say a weapon wheel and a conversation wheel.  You could pass in your weapons values or your conversations values and the code will figure out which index should be selected.

There is one more thing we need to do to determine our index.  Since we added that offset value to our index we can get an invalid index value of 8 once we hit 337.5 (360-22.5) degrees or higher.  So we need to roll over our index back to 0 since we are on the bottom part of our first selection item (ROUNDED).  Add this to the Update method:

if (index == selections.Count)
    index = 0; //since we are adding in 22.5, we will go over, so reset it

Should you not like using a condition you can do a bit AND to accomplish the same task.  It is a little less readable but it isn’t too bad:

index = (int)((degrees + 22.5f) / 45) & (selections.Count -1 );

This does a bit AND of 7 (we have 8 selections) so this will return 0 to 7 which is what we are after.
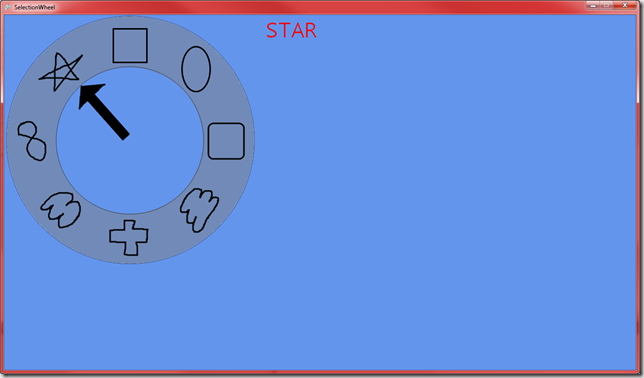
image

When you run the game you should be able to select any point on the wheel with the gamepad and have the text update as you move the thumbstick.

Degrees are for wimps, I only use Radians!

If for some reason you enjoy working with radians and converting to degrees seems wrong to you then you could use the following:

index2 = (int)((radians + MathHelper.TwoPi + (0.3926990816987241f)) / MathHelper.PiOver4) 
                                                                & (selections.Count - 1);

I just used the same formula we used for degrees but instead of adding 360 I added TwoPi.  This is ok since at the end I bit AND the value by my selection count - 1.  So it handles overflows just fine. MathHelper.PiOver4 (Pi/4) is 45 degrees.  The obnoxious number of ~0.392 is the offset of PiOver4 / 2.

By the way, if converting radians to degrees is wrong, then I don’t want to be right. This is one of those micro optimizations that most likely isn’t worth it and you shouldn’t sacrifice readability unless you have an extreme situation.

Wrap Up

So grab the code and toy around with it.  Some things to try:

  1. Embed this code inside a condition that checks if the Left Trigger or Left Bumper being pressed.
  2. Add in the actual selection code of what happens when the user presses A.
  3. Use actual objects and add an Enabled flag to determine if you want the user to be able to select that value. Either keep the arrow from moving to those locations and hide the selections or just dim them and don’t let the user select them.
  4. Have fun with it!

Download the Source Code and Assets

Happy Coding!

-Chad

Shake that Camera

I was browsing the educational catalog on the App Hub and I saw something that I had missed previously.  I wanted to point it out and also point out that if you haven’t been to the educational catalog section in a while, you should go browse it for some nice examples.

The little demo I saw was one that shakes the camera.  It also vibrates the controller (or the Phone).  It was pretty easy to take the important pieces of code and modify the Camera object I used in the XELibrary (the library the book uses).


Inside the Update method of the game class (i.e. Game1 inside of Game1.cs) you can add the following code:

if ((input.ButtonHandler.WasButtonPressed((int)PlayerIndex.One, Buttons.A) || (input.KeyboardState.WasKeyPressed(Keys.Space))))
{
    camera.Shake(25f, 2f);
}


Next, we need to actually create that method (Shake) on the camera.  Since we would want to use this on the FirstPersonCamera and the static Camera we will apply it to the base class Camera.  Add the following variables to Camera.cs:

// We only need one Random object no matter how many Cameras we have
private static readonly Random random = new Random();
 
// Are we shaking?
private bool shaking;
 
// The maximum magnitude of our shake offset
private float shakeMagnitude;
 
// The total duration of the current shake
private float shakeDuration;
 
// A timer that determines how far into our shake we are
private float shakeTimer;
 
// The shake offset vector
private Vector3 shakeOffset;


Next, add the following two methods to the Camera.cs file:

/// <summary>
/// Helper to generate a random float in the range of [-1, 1].
/// </summary>
private float NextFloat()
{
    return (float)random.NextDouble() * 2f - 1f;
}
 
/// <summary>
/// Shakes the camera with a specific magnitude and duration.
/// </summary>
/// <param name="magnitude">The largest magnitude to apply to the shake.</param>
/// <param name="duration">The length of time (in seconds) for which the shake should occur.</param>
public void Shake(float magnitude, float duration)
{
    // We're now shaking
    shaking = true;
 
    // Store our magnitude and duration
    shakeMagnitude = magnitude;
    shakeDuration = duration;
 
    // Reset our timer
    shakeTimer = 0f;
}

The first method is just a helper method we need soon.  The second method is the public Shake method on our camera that initializes the values so we can begin shaking the camera’s view.

Finally, in the Update method of Camera.cs add replace the following code at the bottom of the method:

Matrix.CreateLookAt(ref cameraPosition, ref cameraTarget, ref cameraUpVector,
   out view);

With the following code:

// If we're shaking...
if (shaking)
{
   // Move our timer ahead based on the elapsed time
   shakeTimer += (float)gameTime.ElapsedGameTime.TotalSeconds;
 
   // If we're at the max duration, we're not going to be shaking anymore
   if (shakeTimer >= shakeDuration)
   {
       shaking = false;
       shakeTimer = shakeDuration;
   }
 
   // Compute our progress in a [0, 1] range
   float progress = shakeTimer / shakeDuration;
 
   // Compute our magnitude based on our maximum value and our progress. This causes
   // the shake to reduce in magnitude as time moves on, giving us a smooth transition
   // back to being stationary. We use progress * progress to have a non-linear fall 
   // off of our magnitude. We could switch that with just progress if we want a linear 
   // fall off.
   float magnitude = shakeMagnitude * (1f - (progress * progress));
 
   // Generate a new offset vector with three random values and our magnitude
   shakeOffset = new Vector3(NextFloat(), NextFloat(), NextFloat()) * magnitude;
 
   // If we're shaking, add our offset to our position and target
   cameraPosition += shakeOffset;
   cameraTarget += shakeOffset;
}
 
Matrix.CreateLookAt(ref cameraPosition, ref cameraTarget, ref cameraUpVector,
   out view);


So whe the main game class calls camera.Shake, the flag shaking becomes true and the shaeMagnitude, shakeDuration and shakeTimer are set.  This way when the camera game component has its Update method called, it sees that it needs to shake the camera and adds the game’s total seconds to the shakeTimer and if it has already been shaking too long it sets it to false and resets the shakeTimer.  Assuming it hasn’t been shaking long enough (or even started)  it computes the progress and determines the magnitude of the shaking from that value.  It then uses that magnitude to create an offset with some randomness.  The cameraPosition and cameraTarget then has the offset added to it.  This is what makes the camera shake.  When the view is calculated again it has new values for the camera position and target.

So just a little bit of code allows us to create a cool shaking effect in our games.  Nice.

Happy Coding!

-Chad

Using the Built In Dual Texture Effect in Game Studio 4.0

Since XNA Game Studio Express 1.0 (later the Express was removed from the name) we have had the built-in BasicEffect.  This has allowed developers to create games without actually needing to learn HLSL.  HLSL is awesome, so I’d highly encourage you to learn it.  It is not only beneficial in XNA but also in Silverlight and WPF.  Regardless, if someone is just getting started learning HLSL can slow down the process of getting something on the screen.  Microsoft decided to create the BasicEffect to handle scenarios where creating custom shaders in HLSL is not needed or maybe just not wanted to begin with.

In XNA Game Studio 4.0 Microsoft has added new built in effects.  Currently, Windows Phone 7 does not provide support for custom shaders.  The team found that many scenarios can be handled with the built in effects they built.  They are: BasicEffect, DualTextureEffect, AlphaTestEffect, EnvironmentMapEffect, SkinnedEffect.

This post will discuss the DualTextureEffect.  BasicEffect allows you to use a single texture.  As expected the DualTextureEffect allows you to use two.  It allows you to blend 2 textures together.  A typical purpose for using this texture is to use Light Maps.  The idea behind light maps is to basically figure out your lighting at build time and store those to a texture.  Then apply that light texture to the scene to make it look like you have complex lighting even though none exists.

To actually use the effect is very straightforward.  Simply instantiate the effect and set the camera up normally, set the Texture and Texture2 properties on the effect and apply the effect to the model.  Texture will most likely be your color map (colored texture for your model) and Texture2 will most likely be your light map.  If your second texture was all black, then the resulting image that will be applied to the model will be all black.  If the second texture is all white, then it will use the color as it exists from the other texture.  Any other color will blend – 50% gray will have the color unchanged, >  50% gray and the color becomes brighter, < 50% gray and the color becomes darker.  Shawn Hargreaves has a great article on this topic.

To see Microsoft’s HLSL code in how they created these effects, take a look at the stock effects sample:

http://create.msdn.com/en-US/education/catalog/sample/stock_effects

Running a Game in Full Screen in Windows Phone 7

If you create a game in Windows Phone 7 using XNA you may not want the Application Bar to be displayed.  You can hide that status bar in Windows Phone 7 by setting the GraphicsDeviceManager.IsFullScreen property to true.  The default is false.

public Game1() 
{ 
   graphics = new GraphicsDeviceManager(this); 
   graphics.IsFullScreen = true; 

Getting Started with XNA Game Studio 3 Hands On Lab

This is a lab I originally created for the Carolina Code Camp. The lab covers two main items:

Platformer Starter Kit

  • Creating the Platformer Starter Kit
  • Compiling and Running Platformer
  • Modifying Level 1

Indeterminate Progress Bar

  • XNA Framework 2D Basics
  • Creating an Indeterminate Progress Bar Demo
  • Drawing 2D Text


The lab is adapted from my Microsoft XNA Game Studio 3.0 Unleashed book.

Download the lab and give it try. It takes about an hour to complete.

Happy Programming!

-Chad

Zune HD Scribble Test – Source Code

I did a talk yesterday at the Raleigh Code Camp. It went well I think. If anyone was at the talk and would like to give me feedback, feel free. The only way I’ll get better is if I know how effective / non effective the talk was.

It is always interesting trying to give a talk to an audience with people who have no clue what XNA is as well as those who have been fooling with it for a year or more. Ultimately, there are parts where both parties are bored – but hopefully not at the same time!

Anyway, while the talk was more about best practices for XBLIG and what you need to do to submit games to ultimately make money using XNA, we did spend the last 10-15 minutes of the session looking at a scribble app I made for the Zune HD on Friday night before the session.

Rob Zelt mentioned on twitter that I may have very well been the first person to do an XNA talk with a demo for the Zune HD at a Code Camp. Seeing how the Zune HD was just released this past week and typically Code Camps are held on Saturdays and I had the second session of the day at 9:40 EST I think he may be right. For some reason that makes me smile. A geeky gold star for me.

OK, now to the actual project. You can download the project and look at the comments to see what it is doing. I also did a brief video on it Friday night after I got it working.

At a high level, the code is simply looking at the touch panel collection to see all of the points / vector2 that were moved. It grabs the starting and ending point for this move and adds it to a list. We then draw a line from the starting point to the ending point and do that for each line segment in our line list. To erase it, we just shake the device. Really, we are just checking the difference of the acceleration on the X or Y axis to see if it has moved a certain amount in a frame. This way if someone just moves it slowly or turns it the screen won’t erase, but if it is a fast enough motion (easily produced by shaking) then we clear the line list so there is nothing to draw. The demo code also collects the rotation of the device from the accelerometer as well as the acceleration, but doesn’t actually use the rotation values.

Hopefully this will give you an idea of what is needed, but you should definitely check out the documentation from XNA Game Studio. In order to run this, you will need a Zune HD as well as the latest XNA Framework which comes in XNA Game Studio 3.1 Zune Extensions.

Download Zune HD Scribble Test

Happy Coding!

-Chad

Advanced Debugging Tutorial – Part Two

In the first tutorial we talked about some of the advanced debugging techniques. In this tutorial we will take it a step further and create a debugger visualizer. When we look at data while debugging, sometimes the default representation isn’t quite good enough. For example, the value of a Matrix variable is displayed as simply a string. We could make it into a table structure that actually represents the Matrix. We could also actually display the real color instead of just the color name or RGBA values.

In this tutorial we will be creating a color visualizer. When creating a debugger visualizer there are a few steps that have to take place. We need to do a few more things to get the visualizer be a Windows form that utilizes XNA.

image

Typically one would do the following steps to create a normal visualizer:

  1. Create a class library projects
  2. Add appropriate references (Microsoft.VisualStudio.DebuggerVisualizers; System.Windows.Forms)
  3. Create a class and make the class inherit from the abstract class DialogDebuggerVisualizer
  4. Override the Show method from the abstract class
  5. Add the assembly attribute DebuggerVisualizer setting the appropriate properties
  6. Copying the compiled assembly into one of two folders so Visual Studio can load it and use it

We will be altering the earlier steps a little since we are going to start off with a Creators Club Online Educational Example. We want our windows form to actually utilize XNA and there is no reason to reinvent the wheel. Let’s get started!

Start with the Educational Example: WinForms Series 1: Graphics Device

Extract this to a new folder called XNAVisualizer

Rename the project to XNAVisualizer

Rename the solution file to XNAVisualizer.sln

Open the solution file and rename the project in the Solution Explorer

Rename all of the namespaces to XNAVisualizer.

A shortcut for renaming all of the namespaces is to change one name and then click on the dropdown it makes and select “Rename ‘WinFormsGraphicsDevice’ to ‘XNAVisualizer’

image

Change the project type from Windows Form to Windows Library.

Double click on the Properties node in the Solutions Explorer. Under the Application tab change the Output Type from Windows Application to Class Library

image

While we have the properties window open, we can change the Assembly Name to XNAVisualizer

Delete the SpinningTriangleControl from the project.

Rename SpriteFontControl to ColorControl

We will be adding this control to the form later. This is the control that will display the color being debugged.

Add the following public field to the new ColorControl

public Color BackgroundColor = Color.CornflowerBlue;

Change the contents of the ColorControl’s Draw method to contain:

GraphicsDevice.Clear(BackgroundColor);

spriteBatch.Begin();
spriteBatch.DrawString(font, BackgroundColor.ToString(), new Vector2(10, 10), Color.Black);
spriteBatch.DrawString(font, BackgroundColor.ToString(), new Vector2(11, 11), Color.White);
spriteBatch.End();

In the Initalize method replace the following line:

content = new ContentManager(Services, "Content");

with these three statements:

Assembly visualizerAssembly = Assembly.GetExecutingAssembly();
content = new ContentManager(Services);
content.RootDirectory = visualizerAssembly.Location.Replace(
    visualizerAssembly.ManifestModule.Name, @"Content\"); 

Since this assembly will be running in a special folder we need to explicitly tell it where it can find the Content assets. We are using the Arial font from the original project. We are displaying the Color’s RGBA values using the font. The code is using reflection to get the executing assembly (our visualizer) and then setting the path to the path of the assembly and appends Content\ to the end of it. The Location property contains the full path including the assembly name (XNAVisualizer.dll). The ManifestModule.Name contains the assembly name as well. We are simply removing the assembly name from the path.

Since the code is using reflection we need to add the following using statement to the top of our ColorControl.cs file:

using System.Reflection;


Now we can bring our attention to the MainForm.

Remove all controls from the MainForm form

Double click on the MainForm.cs file

Click Ignore Errors and Continue

Remove the combo boxes, the split panel and delete each one. You may have to right click on the form and choose Select ‘spltContainer1’. Once it is selected you can hit the Delete button on the keyboard to remove it.

Make the form itself a lot smaller. For this we are simply wanting to display the color and the RGBA values of the color so it doesn’t need to be too large.

Compile the project and double click on the error to bring us into the MainForm.Designer.cs. Remove the SpinningTriangleControl and vspriteFontControl variables.

Remove the vertexColor_SelectedIndexChanged method from the MainForm class.

Remove the three vertexColors from the MainForm constructor.

Recompile to see 0 errors.

Open the design view of the MainForm again.

Re-add the ColorControl directly to the form by dragging it from the toolbar (under XNAVisualizer Components)

Expand the ColorControl so it fills up the entire form.

Change the form’s FormBorderStyle in the properties panel to FixedToolWindow. This keeps the window from being resized.

Change the Text of the window to “XNA Color Visualizer”

Drag the ColorDialog (from the toolbox under either the All Windows Forms or Dialogs tabs) to the form. This will create colorDialog1.

Double click on the ColorControl to create the _Click event.

Replace the contents of the MainForm class with the following:

public MainForm()
{
    InitializeComponent();
} 

public XnaColor Color
{
    get
    {
        return (colorControl1.BackgroundColor);
    }
    set
    {
        colorControl1.BackgroundColor = value;
        colorControl1.Invalidate();
    }
} 

private void colorControl1_Click(object sender, System.EventArgs e)
{
    if (colorDialog1.ShowDialog(this) == DialogResult.OK)
    {
        Color = new XnaColor(colorDialog1.Color.R, colorDialog1.Color.G, colorDialog1.Color.B, colorDialog1.Color.A);
    }
}

We added a public property Color. The example code declared XnaColor as a type to help distinguish from the XNA Color and the Windows Form Color. We are using the XnaColor type. We simply return the BackgroundColor of our colorControl when Get is called. And for Set we, we set the background color of the control as well as Invalidate our control so it will be redrawn. We could have hooked into the Idle event and called Invalidate continually, but there is no need for this control. The original example does this with the SpinningTriangleControl. Reading the WinFormsGraphicsDevice.htm file would be beneficial to see the pieces of the code we are using but not discussing like GraphicsDeviceControl, GraphicsDeviceService and ServiceContainer.

We populated the colorControl1_Click method by actually displaying the built in Windows Color Dialogbox. If the user clicks OK, we get the selected color from the dialog box and set our color property to the newly selected color. Our color property then sets the BackgroundColor property of the ColorControl. Note: This control does not let us change the Alpha value of the color.


The last thing we need to do is actually create our Visualizer code.

Add a new blank code file and name it ColorVisualizer.cs.  Paste the following code:

using System.Diagnostics;

using Microsoft.VisualStudio.DebuggerVisualizers;
using Microsoft.Xna.Framework.Graphics;

[assembly: DebuggerVisualizer(
    typeof(XNAVisualizer.ColorVisualizer),
    Target = typeof(Microsoft.Xna.Framework.Graphics.Color),
    Description = "XNA Color Visualizer")]

namespace XNAVisualizer
{
    public class ColorVisualizer : DialogDebuggerVisualizer
    {
        protected override void Show(IDialogVisualizerService windowService,
                                     IVisualizerObjectProvider objectProvider)
        {
            Color c = (Color)objectProvider.GetObject();

            using (MainForm form = new MainForm())
            {
                form.Color = c;

                windowService.ShowDialog(form);

                if (objectProvider.IsObjectReplaceable)
                {
                    if (form.Color != c)
                    {
                        objectProvider.ReplaceObject(form.Color);
                    }
                }
            }
        }

    }
}

We have to add a reference to the Microsoft.VisualStudio.DebuggerVisualizers assembly by clicking on the References tree node in the Solution Explorer under the XNAVisualizer project. Making sure we are on the .NET tab we scroll down and select the assembly and add it to our references.

The assembly attribute DebuggerVisualizer tells VisualStudio this is the entry point for the visualizer. It tells it what type of data it is visualizing as well as the description.

The visualizer class itself inherits from the DialogDebuggerVisualizer abstract class. We override the Show method to actually display our form with the data being investigated by the debugger. We look at the objectProvider object passed in and cast it to our Color type. We set the Color property on the MainForm to the value we are debugging. We then actually display the MainForm by calling ShowDialog on the windowService object passed in.

If all we wanted to do was display the color we would be done. However, it would be nice to actually change the color on the fly while debugging. This is why we added the Color Dialogbox. We first check to see if the object we are viewing is replaceable. It won’t be replaceable, for example, if we are debugging an enumerated type (i.e. Color.Black). However, if it is a variable holding a value then it will be replaceable and we replace the object by calling ReplaceObject on the objectProvider object passing in our new object (form.Color in this case). There is also a ReplaceData method, but we aren’t discussing that in this tutorial.

After compiling the assembly we need to place it in one of two directories:

\$Documents\Visual Studio 2008\Visualizers

or

\Program Files\Microsoft Visual Studio 9.0\Common7\Packages\Debugger\Visualizers

Since we have Content assets we also want to copy the Content folder and any assets to the Visualizers folder as well. It can be tedious to copy the assemblies and content assets after every compile. We can create a Post Build Event command line to copy it for us. We need to open the properties of the XNAVisualizer project (by double clicking on the Properties node in the Solution Explorer) and go to the Build Events tab. Click on the Edit Post-build button and paste the appropriate variation of the following command and hit OK:

copy "$(TargetPath)" "C:\Users\<User Name>\Documents\Visual Studio 2008\Visualizers"
md "C:\Users\<User Name>\Documents\Visual Studio 2008\Visualizers\Content"
copy "$(TargetDir)\Content\*.*" "C:\Users\<User Name>\Documents\Visual Studio 2008\Visualizers\Content"

(Change the paths as needed)

Now when we run a regular XNA project and we want to debug the color we simply set the breakpoint and when we hover over the color variable we want to debug we click the Magnifying Glass icon which will bring up our newly created form.

Fortunately, the XNA Framework team did a lot of the heavy lifting for us (as usual) in this example by allowing us to utilize XNA in a Windows Form. We simply modified the example to be a Class Library and added the actual Visualizer code.

Debugging the Debugger Visualizer

To debug a debugger visualizer a static test method can be created and then a console app can be created to call the static method. This can be a great way to test the visualizer. Instead of creating a console app with all of the XNA assemblies referenced, I debugged the visualizer by  attaching to another Visual Studio instance.

In the Debugger Visualizer project click on Debug / Attach to Process. A dialog will come up. Select Visual Studio instance you want to debug. This would be your real XNA project that has a XNA Color variable.

image

Now when we set a break point in the main XNA project and hover over a Color variable and hit the magnifying glass it will kick off the Visualizer Debugger and if we had a breakpoint we could step though the code. Pretty cool!


A great next step would be to create another visualizer in this project to display Matrices.

For more reading on Visualizers look in the following here.

Download the code from this tutorial here.

Happy Coding!

-Chad

XNA Game Studio 3.1 Avatar Tutorial

Microsoft XNA Game Studio 3.1 was released today and as a result I had to get my hands dirty with the avatars. I've been waiting on this since August of last year when I heard about NXE and went to GameFest where I saw how the native Xbox developers could make calls to render the user's Avatar.

I've followed Dean Johnson's blog where he has written a few entries about the avatar system. I was really looking forward to it. Things at my day job have been pretty hectic recently and I've been putting in some late hours - reminds of when I was writing the book - so if this tutorial isn't up to snuff, I'll come back and edit it. But for now, I wanted to get the information out there for people to be able to start playing with this cool feature.

The end result of what we will be building is a quick demo that allows the user to generate a random avatar and cycle through pre-built animations of our own avatar.

Preview


Let's get started!

This tutorial is going to assume you know how to draw 3D objects and use a camera. I won't be discussing those items here. This is purely to get going with displaying the 3D avatars. I used code from chapter 6 in my books as a starting point. It has it's own camera and input classes. The 2.0 code for that chapter is available on my downloads page.

We need to declare the following member fields that will store our randomly generated avatar data:

AvatarDescription avatarDescription;
AvatarRenderer avatarRenderer;
AvatarAnimation avatarAnimation;


Next, we can add in the member fields that will store our own avatar's data:

AvatarRenderer personalAvatarRenderer;
AvatarAnimation personalAvatarAnimation;


We can also store the current animation of our personal avatar:

AvatarAnimationPreset currentAnimation = (AvatarAnimationPreset)0;


We just set the default animation to the first one in the AvatarAnimationPreset enum.

Then inside of the constructor we set the backbuffer width and height. I set it to 1920 x 1080 since that is the display connected to my Xbox 360.

graphics.PreferredBackBufferHeight = 1080;
graphics.PreferredBackBufferWidth = 1920;

graphics.ApplyChanges();


I then added my own FirstPersonCamera and InputHandler game components (feel free to use your own):

input = new InputHandler(this, true);
Components.Add(input);

camera = new FirstPersonCamera(this);
Components.Add(camera);


It is very important to include the GamerServicesComponent so we can obtain the avatar information:

Components.Add(new GamerServicesComponent(this));


In the LoadContent method we can add the following:

avatarDescription = AvatarDescription.CreateRandom();
avatarRenderer = new AvatarRenderer(avatarDescription);
avatarAnimation = new AvatarAnimation(AvatarAnimationPreset.Clap);

font = Content.Load<SpriteFont>(@"Fonts\Arial");

We are obtaining the description of the avatar by calling the CreateRandom method. We then take the description and apply it to the actual renderer. Finally we initialize an animation that we will use later. (We also are going to display the name of the animation our personal avatar will be doing so we added the font.)

Now we can add the following logic to our Update method (You can substitute your own input handler code):

PlayerIndex playerIndex;

if (input.WasPressed(null, Buttons.A, Keys.Space, out playerIndex))
{
    avatarDescription = AvatarDescription.CreateRandom();
    avatarRenderer = new AvatarRenderer(avatarDescription);
}

if (input.WasPressed(null, Buttons.B, Keys.B, out playerIndex))
{
    currentAnimation++;
    if (currentAnimation >= AvatarAnimationPreset.MaleYawn)
        currentAnimation = (AvatarAnimationPreset)0;

    if (personalAvatarAnimation != null)
        personalAvatarAnimation = new AvatarAnimation(currentAnimation);
}

avatarAnimation.Update(gameTime.ElapsedGameTime, true);

if (personalAvatarRenderer == null)
{
    foreach (SignedInGamer gamer in SignedInGamer.SignedInGamers)
    {
        personalAvatarRenderer = new AvatarRenderer(gamer.Avatar);
        break;
    }

    personalAvatarAnimation = new AvatarAnimation(currentAnimation);
}

personalAvatarAnimation.Update(gameTime.ElapsedGameTime, true);


We check to see if the user pressed the A button. If so, we generate a brand new random avatar. If they press B then we increment the currentAnimation value, reseting to zero if we get to the end of the enum values. The .NET Compact Framework on the Xbox 360 doesn't support Enum.GetValues so we will simply convert to an integer to iterate through them.  We then change the animation playing in our personal avatar to our new value.

We then call update on the random avatar, passing in the elaspsed time and true which means we want to loop this animation.

If the personal avatar hasn't been created yet, then we grab the first signed in gamer (this could definitely be more robust) and pass in the gamer's Avatar description to the AvatarRenderer. We also initialize the animation for the personal avatar. Finally we call update on the personal avatar also telling it to loop.


All of this is fine, but we haven't actually drawn anything to the screen. We can correct that now by adding the following code to the Draw method:

avatarRenderer.World = Matrix.CreateRotationY(MathHelper.ToRadians(180.0f)) * Matrix.CreateScale(10);
avatarRenderer.Projection = camera.Projection;
avatarRenderer.View = camera.View;

avatarRenderer.Draw(avatarAnimation.BoneTransforms, avatarAnimation.Expression);


if (personalAvatarRenderer != null)
{
    personalAvatarRenderer.World = Matrix.CreateRotationY(MathHelper.ToRadians(180.0f)) *
        Matrix.CreateTranslation(new Vector3(3, 0, 0)) * Matrix.CreateScale(10);
    personalAvatarRenderer.Projection = camera.Projection;
    personalAvatarRenderer.View = camera.View;

    personalAvatarRenderer.Draw(personalAvatarAnimation.BoneTransforms, 
        personalAvatarAnimation.Expression);
}

spriteBatch.Begin();
spriteBatch.DrawString(font, currentAnimation.ToString(), new Vector2(20, 20), Color.Black);
spriteBatch.DrawString(font, currentAnimation.ToString(), new Vector2(21, 21), Color.Yellow);
spriteBatch.End();


We set the World, View and Projection matrices on the avatars. Based on my camera and world settings, I scaled the avatar by 10 units. We then actually call the Draw command passing in the bone transforms and the avatar expression so it knows how to draw the avatar.

We finish up by drawing the current animation to the top left of the screen.

The XNA Framework team did a fantastic job of providing avatar functionality that is extremely easy use. They also exposed ways to work with data at a more lower level. I hope to see some really awesome avatar games!

Final Result

Happy Coding!

-Chad

Advanced Debugging Tutorial - Part One

In order to make games or any application these days it really helps to understand how the debugger works in your IDE. Since this site is all about XNA and specifically XNA Game Studio and the XNA Framework our IDE of choice is Visual Studio / Visual C# Express. For this series the majority of the tips are only available in Visual Studio (denoted by *). This series is going to discuss some cool tips and tricks for debugging our applications. Let's get started ...

Simple Breakpoints

Setting a break point is pretty simple by either clicking in the "Gutter" on the IDE or hitting F9. Doing this will toggle the breakpoint to be present or not.

image

Also we can display debugging information in the output window inside of the IDE. For example, if we use the following code:

System.Diagnostics.Debug.WriteLine("This is my debug message.");

We can see the results printed in the Output window of the IDE:

image

If we want to leave a breakpoint location, but want to disable it we can right click on the breakpoint and choose Disable Breakpoint. (Take note of the other options as we will be discussing them a little later)

image

After the breakpoint is disabled it is represented by a circle:

image

This can be beneficial as well, but we can do better than basic breakpoints and glorified printf statements.

Advanced Breakpoints*

Now we can get to the meat of the tutorial! The first thing to note is that it is best to start the debugging before setting up advanced breakpoints. It is not required, but the benefit is that the symbol tables are available instead of only Intellisense.

The Advanced Breakpoint image  allows setting a hit count, a condition or a filter.

Hit Count

To set a hit count, simply right click on a basic breakpoint and select "Hit Count" from the context menu. The following dialog will be displayed:

image

The code will execute skipping over the breakpoint until that line is called 1,000 times.

Here are the options available from the Breakpoint Hit Count dialog box:

 image

The first option, "break always", describes a basic breakpoint where anytime that code is about to be executed we break into the code.

The second and last options are easy enough to comprehend as the code will only break when the code has been executed a certain number of times.

The third option, "break when the hit count is a multiple of", can be thought of as a modulus calculation. If we used the value 60 for example, then we are asking the compiler to break execution every 60th time the code is executed. For XNA Games this could break the code once a second assuming we were running at 60fps and the break point was in the appropriate method.

Condition

Not only can we specify a hit count for our advanced breakpoint, but we can also specify a condition.

image

Just as the description reads, this will evaluate the expression entered and will only break if the expression is true or if the expression has changed. An interesting thing to note here is that it actually executes code. For example, if we were in a for loop with a typical index variable of i we could actually cause an infinite loop if we were not careful. In C# we do comparisons by using a double equal sign (==). A single equal sign (=) is used for setting values. So if we wanted to break when our for loop indexer i hit 20 but we put i=20 in the box then every time the compiler executed the expression it would actually set our variable i to 20 effectively causing our for loop to last forever (assuming the condition to break out of the for loop is when i is greater than some value over 20). So be careful to actually use a comparison operator.

An expression can be as simple as a variable. We could simply put in "i" (without quotes) and set the "Has changed" radio button. This would break the execution whenever the variable "i" had a value change.

Methods could even be called from this window. An entire debug class could be created that checks values for nulls or whatever is required. So something like DebuggerHelper.CheckValue(someValue) would be valid assuming that CheckValue returns a boolean type.

Filter

We can also set break points on certain machines, processes and/or threads.

image

For this dialog, even in C# using a single equal sign is allowed. Fortunately, the typical double equal signs is also allowed. Assuming our application had multiple threads (which can be helpful for long running content loads, etc) we can break the code only when we are in a particular thread. In this example it is assumed we have a thread created and we explicitly named it "SomeWorkerThread". When any other thread executes the code we have set this breakpoint on, the code will not break. However, as soon as the thread we specified hits the code the execution will be paused.

Stepping through threaded code can be aggravating since stepping through the code will jump all over the place if we do not know how to ignore other threads. Fortunately we can do this by making sure our debug toolbar is visible by selecting it from the View > Toolbars > Debug menu item:

image

This will bring up the following toolbar:

image

To view the other threads while debugging our code we can select the "Show Threads in Source" button image

Using this toolbar we can also open the Breakpoints window by clicking the "Breakpoints" button image

This brings up the following window where we can more easily manage our breakpoints:

image

By clicking on the Columns button we can add the columns we want. By default Hit Count, Filter and When Hit are not displayed.

OK, back to our threading issue...

First it would be nice to see all of the threads in the app. Well just like our Breakpoints window we can bring up the Threads window by clicking Debug > Windows > Threads or pressing CTRL + D, T

 image

We can see which piece of code our threads are in here. Remember by clicking the image button we can see the current location of the running thread by looking at the "Gutter" in the IDE (the same area where the breakpoint icons are displayed).

image

The last thing to note about Advanced Breakpoints is that Hit Counts, Conditions and Filters are ANDed together. So all conditions need to be met to actually break into the code.

Debugging .NET Framework Source Code*

Sometimes it can be beneficial to actually break into the .NET Framework source code when debugging. Yes, there is Reflector, but you can't exactly step into the code and you can't see the comments. Stepping into the .NET Framework code can be beneficial when some operation is failing (like the system saying a file doesn't exist when it definitely appears it does). By stepping through the code it may actually show that it is really an access denied error.

In order to enable the .NET Framework source stepping simply by going to Tools > Options and checking the "Enable .NET Framework source stepping" check box under Debugging / General as shown below:

image

After getting the dialog box that "Just My Code" is no longer selected you will see another dialog box talking about symbols. To get to the location simply click the Symbols tree node under Debugging.

image

You then need to add the following symbol locations:

http://referencesource.microsoft.com/symbols

http://msdl.microsoft.com/download/symbols

Then in the "Cache symbols from symbol servers to this directory" enter a permanent folder such as:

c:\dotnetsymbols

The next time you debug you will get a dialog box with a EULA for the source code.  Instead of only downloading pieces of the framework as you are working on it you may want to download all of it at once. This can especially be helpful if you work offline. There is a codeplex project, NetMassDownloader, that does just that.

Evaluation Windows

While discussing breakpoints we touched on the evaluation of breakpoint conditions. This evaluation functionality is also available in a few other windows as well.

Locals, Auto and Watch Windows

You can add particular variables to the Watch window. The Locals and Auto windows are populated / depopulated based on the scope of the application. You can click in the Value column and modify the value. This doesn't only work for value types but it also works for reference types. For example the texture greyAsteroid has a value assigned to it, but I am redefining it at runtime by typing in Content.Load<Texture2D>(@"Textures\asteroid1") in the Value column and pressing enter.

image

It is also legal to just create a new object. For example entering new SomeClass() would be a valid entry for the appropriate variable.

There is a little know feature called Make Object ID*. Simply right click on the row with a reference type and select Make Object ID.

 image

It will then associate an object id, for example {1#}, to the object. Since both my greyAsteroid and originalAsteroid variables are both member fields I knew they wouldn't go out of scope so I created a temporary test variable. When I create an Object ID for this variable I now have the following:

 image

Now the benefit of creating an Object ID is that I can see the memory even after it goes out of scope. I just need to type 1# as a new Watch item. Doing this and then stepping out of the method gives me the following results:

image

Notice the test object is out of scope and it is grayed out. Yet, I still have access to the object id. I can continue to look at the memory until the garbage collector runs. I'm not guaranteed how much longer it will be around, but this can be handy in advanced scenarios.

We can even check to see what generation the of the garbage collector the variable is in. We can add GC.GetGeneration(1#) in the Watch window and see the following result:

image

That is pretty cool!

Immediate Window

For the command link junkies there is the Immediate window. This is actually my favorite window. Just like the others you can evaluate expressions. You can also create new objects that you can evaluate at runtime. For example, you can type in

? SomeClass x = new SomeClass();

And then in the Watch window you can watch the value by entering $x.  Now not only can we set simple value types like bool, int, float, etc but we can create a new reference type and then set a value in our code to that new reference while debugging. This can also come in handy.

By the way, ? comes from the Visual Basic days and is short hand for print.

Summary

We discussed basic breakpoints, advanced breakpoints with filters, hit counts and conditions. Hopefully there was information in here that you didn't know existed. This can really help speed up development.

Well that is enough information to think on for this blog post. In the next installment I will walk through creating a Visualizer for Visual Studio.

* Not available in Visual C# Express

Happy Debugging!

Chad

New Tutorial: Storing and Retreiving High Scores

A new tutorial was just added to the site.  It is a section from Chapter 21 in the book.  It shows how to create, load and save a high score list on disk.  It works on the Xbox 360 and on Windows.  It has also been added to the XNAWikiNick Gravelyn started up the site and hopefully it will contain a lot of good content in the coming months.

Happy Coding!

Chad