XNA Essentials

Game Programming for Xbox 360, PC + Windows Phone

NAVIGATION - SEARCH

Xbox LIVE Indie Games

It is official! Xbox LIVE Community Games is now Xbox LIVE Indie Games. The name change will be reflected on xbox.com and Xbox LIVE Marketplace later this summer.

The name change isn’t the only thing happening. The prices options for the games are being changed. The days of listing a game for 800 points (about $10 USD) is coming to an end. To me, it was really difficult for a Creator to compete against expansion packs, and XBLA titles anyway. The new price points will be 80, 240 and 400.

On the Creators Club Online site itself there is a new shiny thing called Reputation. The idea is great and hopefully it will inspire Creators to review and test more games. More information about Reputation can be found here.

Upgrades to Xbox LIVE Indie Games will now be automatic! So if you push out an update to your game, the gamer will be asked if they want to download the most updated version of the game. Very cool!

Also, now Creators get a maximum of 50 tokens for their games. This will allow the Creator to give media outlets an easy way to review their game.

New Countries can now submit Indie Games – Germany and Japan. There are also updates for Sweden and Singapore.

For a complete list of the changes see the official story on the XNA Creators Club Website.

There is no time like the present to create your dream game. Get to it!

Happy Coding!

-Chad

XNA Game Studio 3.1 Avatar Tutorial

Microsoft XNA Game Studio 3.1 was released today and as a result I had to get my hands dirty with the avatars. I've been waiting on this since August of last year when I heard about NXE and went to GameFest where I saw how the native Xbox developers could make calls to render the user's Avatar.

I've followed Dean Johnson's blog where he has written a few entries about the avatar system. I was really looking forward to it. Things at my day job have been pretty hectic recently and I've been putting in some late hours - reminds of when I was writing the book - so if this tutorial isn't up to snuff, I'll come back and edit it. But for now, I wanted to get the information out there for people to be able to start playing with this cool feature.

The end result of what we will be building is a quick demo that allows the user to generate a random avatar and cycle through pre-built animations of our own avatar.

Preview


Let's get started!

This tutorial is going to assume you know how to draw 3D objects and use a camera. I won't be discussing those items here. This is purely to get going with displaying the 3D avatars. I used code from chapter 6 in my books as a starting point. It has it's own camera and input classes. The 2.0 code for that chapter is available on my downloads page.

We need to declare the following member fields that will store our randomly generated avatar data:

AvatarDescription avatarDescription;
AvatarRenderer avatarRenderer;
AvatarAnimation avatarAnimation;


Next, we can add in the member fields that will store our own avatar's data:

AvatarRenderer personalAvatarRenderer;
AvatarAnimation personalAvatarAnimation;


We can also store the current animation of our personal avatar:

AvatarAnimationPreset currentAnimation = (AvatarAnimationPreset)0;


We just set the default animation to the first one in the AvatarAnimationPreset enum.

Then inside of the constructor we set the backbuffer width and height. I set it to 1920 x 1080 since that is the display connected to my Xbox 360.

graphics.PreferredBackBufferHeight = 1080;
graphics.PreferredBackBufferWidth = 1920;

graphics.ApplyChanges();


I then added my own FirstPersonCamera and InputHandler game components (feel free to use your own):

input = new InputHandler(this, true);
Components.Add(input);

camera = new FirstPersonCamera(this);
Components.Add(camera);


It is very important to include the GamerServicesComponent so we can obtain the avatar information:

Components.Add(new GamerServicesComponent(this));


In the LoadContent method we can add the following:

avatarDescription = AvatarDescription.CreateRandom();
avatarRenderer = new AvatarRenderer(avatarDescription);
avatarAnimation = new AvatarAnimation(AvatarAnimationPreset.Clap);

font = Content.Load<SpriteFont>(@"Fonts\Arial");

We are obtaining the description of the avatar by calling the CreateRandom method. We then take the description and apply it to the actual renderer. Finally we initialize an animation that we will use later. (We also are going to display the name of the animation our personal avatar will be doing so we added the font.)

Now we can add the following logic to our Update method (You can substitute your own input handler code):

PlayerIndex playerIndex;

if (input.WasPressed(null, Buttons.A, Keys.Space, out playerIndex))
{
    avatarDescription = AvatarDescription.CreateRandom();
    avatarRenderer = new AvatarRenderer(avatarDescription);
}

if (input.WasPressed(null, Buttons.B, Keys.B, out playerIndex))
{
    currentAnimation++;
    if (currentAnimation >= AvatarAnimationPreset.MaleYawn)
        currentAnimation = (AvatarAnimationPreset)0;

    if (personalAvatarAnimation != null)
        personalAvatarAnimation = new AvatarAnimation(currentAnimation);
}

avatarAnimation.Update(gameTime.ElapsedGameTime, true);

if (personalAvatarRenderer == null)
{
    foreach (SignedInGamer gamer in SignedInGamer.SignedInGamers)
    {
        personalAvatarRenderer = new AvatarRenderer(gamer.Avatar);
        break;
    }

    personalAvatarAnimation = new AvatarAnimation(currentAnimation);
}

personalAvatarAnimation.Update(gameTime.ElapsedGameTime, true);


We check to see if the user pressed the A button. If so, we generate a brand new random avatar. If they press B then we increment the currentAnimation value, reseting to zero if we get to the end of the enum values. The .NET Compact Framework on the Xbox 360 doesn't support Enum.GetValues so we will simply convert to an integer to iterate through them.  We then change the animation playing in our personal avatar to our new value.

We then call update on the random avatar, passing in the elaspsed time and true which means we want to loop this animation.

If the personal avatar hasn't been created yet, then we grab the first signed in gamer (this could definitely be more robust) and pass in the gamer's Avatar description to the AvatarRenderer. We also initialize the animation for the personal avatar. Finally we call update on the personal avatar also telling it to loop.


All of this is fine, but we haven't actually drawn anything to the screen. We can correct that now by adding the following code to the Draw method:

avatarRenderer.World = Matrix.CreateRotationY(MathHelper.ToRadians(180.0f)) * Matrix.CreateScale(10);
avatarRenderer.Projection = camera.Projection;
avatarRenderer.View = camera.View;

avatarRenderer.Draw(avatarAnimation.BoneTransforms, avatarAnimation.Expression);


if (personalAvatarRenderer != null)
{
    personalAvatarRenderer.World = Matrix.CreateRotationY(MathHelper.ToRadians(180.0f)) *
        Matrix.CreateTranslation(new Vector3(3, 0, 0)) * Matrix.CreateScale(10);
    personalAvatarRenderer.Projection = camera.Projection;
    personalAvatarRenderer.View = camera.View;

    personalAvatarRenderer.Draw(personalAvatarAnimation.BoneTransforms, 
        personalAvatarAnimation.Expression);
}

spriteBatch.Begin();
spriteBatch.DrawString(font, currentAnimation.ToString(), new Vector2(20, 20), Color.Black);
spriteBatch.DrawString(font, currentAnimation.ToString(), new Vector2(21, 21), Color.Yellow);
spriteBatch.End();


We set the World, View and Projection matrices on the avatars. Based on my camera and world settings, I scaled the avatar by 10 units. We then actually call the Draw command passing in the bone transforms and the avatar expression so it knows how to draw the avatar.

We finish up by drawing the current animation to the top left of the screen.

The XNA Framework team did a fantastic job of providing avatar functionality that is extremely easy use. They also exposed ways to work with data at a more lower level. I hope to see some really awesome avatar games!

Final Result

Happy Coding!

-Chad

Advanced Debugging Tutorial - Part One

In order to make games or any application these days it really helps to understand how the debugger works in your IDE. Since this site is all about XNA and specifically XNA Game Studio and the XNA Framework our IDE of choice is Visual Studio / Visual C# Express. For this series the majority of the tips are only available in Visual Studio (denoted by *). This series is going to discuss some cool tips and tricks for debugging our applications. Let's get started ...

Simple Breakpoints

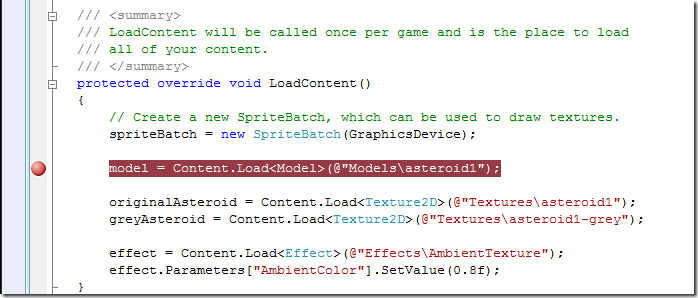
Setting a break point is pretty simple by either clicking in the "Gutter" on the IDE or hitting F9. Doing this will toggle the breakpoint to be present or not.

image

Also we can display debugging information in the output window inside of the IDE. For example, if we use the following code:

System.Diagnostics.Debug.WriteLine("This is my debug message.");

We can see the results printed in the Output window of the IDE:

image

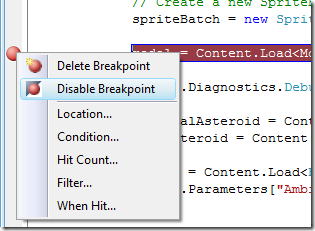
If we want to leave a breakpoint location, but want to disable it we can right click on the breakpoint and choose Disable Breakpoint. (Take note of the other options as we will be discussing them a little later)

image

After the breakpoint is disabled it is represented by a circle:

image

This can be beneficial as well, but we can do better than basic breakpoints and glorified printf statements.

Advanced Breakpoints*

Now we can get to the meat of the tutorial! The first thing to note is that it is best to start the debugging before setting up advanced breakpoints. It is not required, but the benefit is that the symbol tables are available instead of only Intellisense.

The Advanced Breakpoint image  allows setting a hit count, a condition or a filter.

Hit Count

To set a hit count, simply right click on a basic breakpoint and select "Hit Count" from the context menu. The following dialog will be displayed:

image

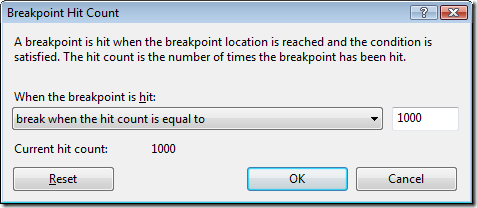
The code will execute skipping over the breakpoint until that line is called 1,000 times.

Here are the options available from the Breakpoint Hit Count dialog box:

 image

The first option, "break always", describes a basic breakpoint where anytime that code is about to be executed we break into the code.

The second and last options are easy enough to comprehend as the code will only break when the code has been executed a certain number of times.

The third option, "break when the hit count is a multiple of", can be thought of as a modulus calculation. If we used the value 60 for example, then we are asking the compiler to break execution every 60th time the code is executed. For XNA Games this could break the code once a second assuming we were running at 60fps and the break point was in the appropriate method.

Condition

Not only can we specify a hit count for our advanced breakpoint, but we can also specify a condition.

image

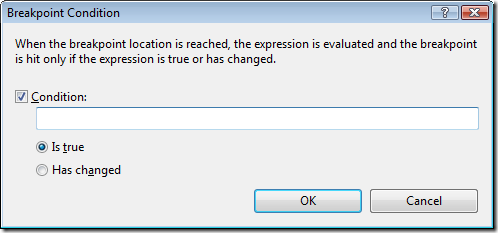
Just as the description reads, this will evaluate the expression entered and will only break if the expression is true or if the expression has changed. An interesting thing to note here is that it actually executes code. For example, if we were in a for loop with a typical index variable of i we could actually cause an infinite loop if we were not careful. In C# we do comparisons by using a double equal sign (==). A single equal sign (=) is used for setting values. So if we wanted to break when our for loop indexer i hit 20 but we put i=20 in the box then every time the compiler executed the expression it would actually set our variable i to 20 effectively causing our for loop to last forever (assuming the condition to break out of the for loop is when i is greater than some value over 20). So be careful to actually use a comparison operator.

An expression can be as simple as a variable. We could simply put in "i" (without quotes) and set the "Has changed" radio button. This would break the execution whenever the variable "i" had a value change.

Methods could even be called from this window. An entire debug class could be created that checks values for nulls or whatever is required. So something like DebuggerHelper.CheckValue(someValue) would be valid assuming that CheckValue returns a boolean type.

Filter

We can also set break points on certain machines, processes and/or threads.

image

For this dialog, even in C# using a single equal sign is allowed. Fortunately, the typical double equal signs is also allowed. Assuming our application had multiple threads (which can be helpful for long running content loads, etc) we can break the code only when we are in a particular thread. In this example it is assumed we have a thread created and we explicitly named it "SomeWorkerThread". When any other thread executes the code we have set this breakpoint on, the code will not break. However, as soon as the thread we specified hits the code the execution will be paused.

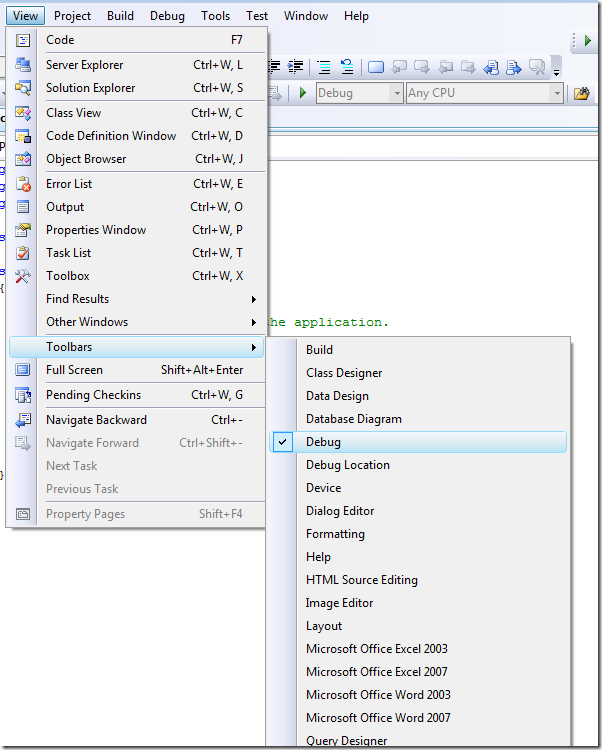
Stepping through threaded code can be aggravating since stepping through the code will jump all over the place if we do not know how to ignore other threads. Fortunately we can do this by making sure our debug toolbar is visible by selecting it from the View > Toolbars > Debug menu item:

image

This will bring up the following toolbar:

image

To view the other threads while debugging our code we can select the "Show Threads in Source" button image

Using this toolbar we can also open the Breakpoints window by clicking the "Breakpoints" button image

This brings up the following window where we can more easily manage our breakpoints:

image

By clicking on the Columns button we can add the columns we want. By default Hit Count, Filter and When Hit are not displayed.

OK, back to our threading issue...

First it would be nice to see all of the threads in the app. Well just like our Breakpoints window we can bring up the Threads window by clicking Debug > Windows > Threads or pressing CTRL + D, T

 image

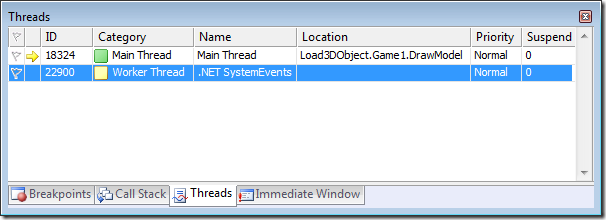
We can see which piece of code our threads are in here. Remember by clicking the image button we can see the current location of the running thread by looking at the "Gutter" in the IDE (the same area where the breakpoint icons are displayed).

image

The last thing to note about Advanced Breakpoints is that Hit Counts, Conditions and Filters are ANDed together. So all conditions need to be met to actually break into the code.

Debugging .NET Framework Source Code*

Sometimes it can be beneficial to actually break into the .NET Framework source code when debugging. Yes, there is Reflector, but you can't exactly step into the code and you can't see the comments. Stepping into the .NET Framework code can be beneficial when some operation is failing (like the system saying a file doesn't exist when it definitely appears it does). By stepping through the code it may actually show that it is really an access denied error.

In order to enable the .NET Framework source stepping simply by going to Tools > Options and checking the "Enable .NET Framework source stepping" check box under Debugging / General as shown below:

image

After getting the dialog box that "Just My Code" is no longer selected you will see another dialog box talking about symbols. To get to the location simply click the Symbols tree node under Debugging.

image

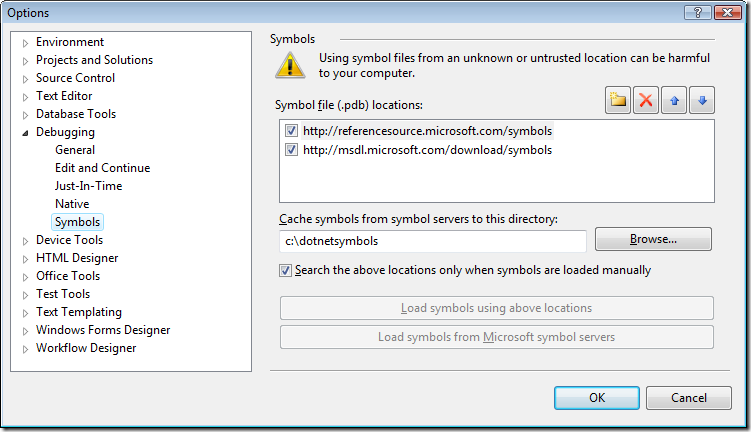
You then need to add the following symbol locations:

http://referencesource.microsoft.com/symbols

http://msdl.microsoft.com/download/symbols

Then in the "Cache symbols from symbol servers to this directory" enter a permanent folder such as:

c:\dotnetsymbols

The next time you debug you will get a dialog box with a EULA for the source code.  Instead of only downloading pieces of the framework as you are working on it you may want to download all of it at once. This can especially be helpful if you work offline. There is a codeplex project, NetMassDownloader, that does just that.

Evaluation Windows

While discussing breakpoints we touched on the evaluation of breakpoint conditions. This evaluation functionality is also available in a few other windows as well.

Locals, Auto and Watch Windows

You can add particular variables to the Watch window. The Locals and Auto windows are populated / depopulated based on the scope of the application. You can click in the Value column and modify the value. This doesn't only work for value types but it also works for reference types. For example the texture greyAsteroid has a value assigned to it, but I am redefining it at runtime by typing in Content.Load<Texture2D>(@"Textures\asteroid1") in the Value column and pressing enter.

image

It is also legal to just create a new object. For example entering new SomeClass() would be a valid entry for the appropriate variable.

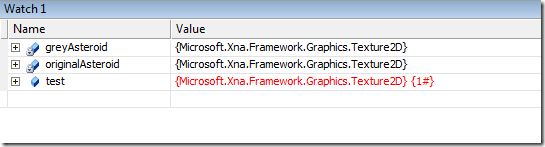
There is a little know feature called Make Object ID*. Simply right click on the row with a reference type and select Make Object ID.

 image

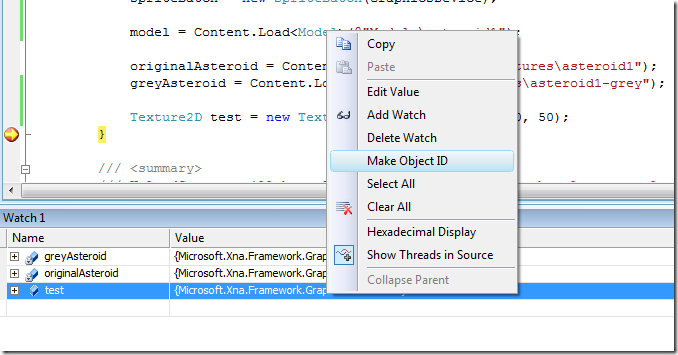
It will then associate an object id, for example {1#}, to the object. Since both my greyAsteroid and originalAsteroid variables are both member fields I knew they wouldn't go out of scope so I created a temporary test variable. When I create an Object ID for this variable I now have the following:

 image

Now the benefit of creating an Object ID is that I can see the memory even after it goes out of scope. I just need to type 1# as a new Watch item. Doing this and then stepping out of the method gives me the following results:

image

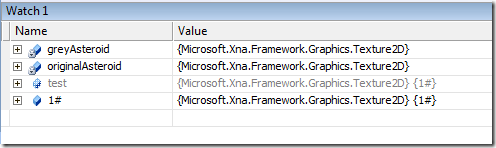
Notice the test object is out of scope and it is grayed out. Yet, I still have access to the object id. I can continue to look at the memory until the garbage collector runs. I'm not guaranteed how much longer it will be around, but this can be handy in advanced scenarios.

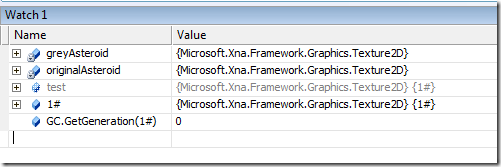
We can even check to see what generation the of the garbage collector the variable is in. We can add GC.GetGeneration(1#) in the Watch window and see the following result:

image

That is pretty cool!

Immediate Window

For the command link junkies there is the Immediate window. This is actually my favorite window. Just like the others you can evaluate expressions. You can also create new objects that you can evaluate at runtime. For example, you can type in

? SomeClass x = new SomeClass();

And then in the Watch window you can watch the value by entering $x.  Now not only can we set simple value types like bool, int, float, etc but we can create a new reference type and then set a value in our code to that new reference while debugging. This can also come in handy.

By the way, ? comes from the Visual Basic days and is short hand for print.

Summary

We discussed basic breakpoints, advanced breakpoints with filters, hit counts and conditions. Hopefully there was information in here that you didn't know existed. This can really help speed up development.

Well that is enough information to think on for this blog post. In the next installment I will walk through creating a Visualizer for Visual Studio.

* Not available in Visual C# Express

Happy Debugging!

Chad

Microsoft XNA Game Studio 3.0 Unleashed Source Code Available

The publisher is allowing the entire contents on the CD that are included in the book to be purchased. This option is available to people who that purchased the Kindle version of the book. For Safari subscribers, the code can be downloaded via Safari. The code can be found on the downloads page.

-Chad

Dream Build Play 2009 Challenge

Registration opened today for DBP 2009. Team registrations will open later in April.

If you have a game on Xbox LIVE Marketplace and you can still enter it into the competition. One of the winners of the first DBP competition, James Silva, just recently had his game published on Xbox LIVE Arcade. The title of the game is The Dishwasher: Dead Samurai. Go download and a trial and give it a whirl.

Get working on your own entry to win a huge amount of cash. Not only that, you can sell your game on the Xbox LIVE Marketplace as soon as it is ready!

Happy Coding!

-Chad

Microsoft XNA Game Studio 3.0 Unleashed Book Has Arrived

My second book, Microsoft XNA Game Studio 3.0 Unleashed has just left the printers. I received a copy of the book yesterday. It is available for purchase from Amazon and other retailers. This book includes 9 new chapters in 3 new sections. These include chapters on creating games for the Zune, creating multiplayer games and best practices to sell games on the Xbox LIVE Marketplace.

More information about the book can be found in the Unleashed section of the site. The errata for the book has been started and can be found here.

I will be revamping this site and will include forums directly on this site so we do not have to use the Amazon forums. I realized recently that the Amazon forums were country dependant and there were posts I didn't see from the UK. Having the forums on my server should help with that. I'm working diligently to get them up soon.

Happy Coding!

-Chad

XNA Game Studio 3.0 Final is Released

XNA Game Studio 3.0 was released today. All the goodies can be found over at the Creators Club website: http://creators.xna.com/

There is a new starter kit. It is called 'Platformer' and it creates a project for all three platforms (Windows, Xbox 360 and the Zune). It is a great way to dig in and see some of the ways to use one code base to run a game on multiple platforms.

Don't delay, go download your very own copy of XNA Game Studio 3.0 today!

Happy Coding!

-Chad

XNA Game Studio 3.0 Beta

Hello XNA Game Studio 3.0 Beta! I'm excited that this is here.

Right on the heals of the Zune 3.0 software and firmware update today.

XNA GS 3.0 Beta allows us to develop games for our Zunes.  With the CTP that was released in the spring, the Zune device had to reboot anytime a game was closed.  Fortunately, they have made it so closing a game now doesn't require the device to reset itself.  I'm very happy about this, but I really wasn't expecting it.  I am sure it wasn't easy to make sure that no game was hogging up resources after it was closed. UPDATE: I was incorrect in the above praise. It seems the two games that were installed with the Zune 3.0 update (Texas Hold'em and Hexic) do not require a reboot, but normal XNA games do.

You can write code for the Xbox 360, but you can't deploy to it in the beta. We can compile our code for the Xbox 360 and that is helpful, but we can't deploy.

That reminds me ... the Dream Build Play contest is winding up.  Submissions have to be in by September 23rd.  As a reward for just submitting an entry, Microsoft is giving away a 4 month premium creators club membership.  That is $49 value - just for submitting an entry.

Again, to submit a game for DBP it needs to be an Xbox 360 project which means it needs to be compiled with XNA Game Studio 2.0.

So get a game submitted!

GameFest 2008

I enjoyed GameFest this year, but there seemed to be a lot more excitement last year.  It may have just been that there were so many announcements last year and the entire DBP finalist and winners.

The big news announced was the fact that Microsoft is 'allowing' game creators to sell their games on Xbox LIVE Marketplace.  I used quotes because if you want your game on Marketplace - it has to be sold.  You will not be able to give your game away.

So at this point you can sell your game for either 200 points (about $2.50), 400 points (about $5.00) or 800 points (about $10.00).  Microsoft takes at least 30% of the sales.  Making 70% on a product in this type of distribution model is excellent.  Additional fees (yet to be determined) will be deducted for transactions and similar things.  If Microsoft puts your game on the 'Featured' page in the Marketplace then they will take an additional 10-30%.  There is no details at this point regarding how games will be picked for this list.  It will be based on some heuristics, but they are still flushing that out.

It is up to the developer as to which tier they want to sell their game in.  There is one exception to this.  If the game is over 50MB (compressed) then it cannot be sold for the lowest tier (200 points).  It must be sold in the middle or high tiers.  It is no problem for a game that is under 50MB to sell for more than 200 points.  The maximum size a game can be (compressed) is 150MB.

Microsoft announced a new dashboard look and feel a couple of weeks ago during E3.  This new look is to try and help with the enormous amount of content in the marketplace.  Because of this new dashboard, when a game is created a new requirement is to also create 'Box Art', which is basically what it says.  If your game was shipping in a box, what would the front cover of the box look like?  There may be a requirement (will definitely be an option) to provide more information like 'Slideshows' which also fall in line with the dash's new look and feel.

I listened to a talk from Frank Savage, who has a new title of Architect.  Frank's talk discussed a few things, but he mentioned 'Frank's 3rd Law' which states:

Optimize because you must not because you can!

So this falls right in line with the whole premise of performance that I go by.  You have to measure.  By measuring you can determine if your game (or application) is performing well enough to meet the goals of the project.  So measure, measure, measure.  Make notes on some code that may be a problem area if frame rates start to suffer, but don't just dive in and really optimize that code until there is actually a problem.  Spend that time writing better game play, or AI or Physics or anything else that is needed for your game.

Shawn Hargreaves had two talks.  One was regarding the Content Pipeline (Eli Tayrien also had a talk on the Content Pipeline) and the other was on Networking.  As expected, both of Shawn's were very good.  In the Content Pipeline talk, I learned about Opaque data which is data you can set in the modeling program that your Content Pipeline can read in and do something with it.  For example, let's say you build out an entire 3D level in Maya or 3D Studio Max.  You can put place holders in the level for Triggers for example.  Those meshes can be assigned Opaque Data that the Content Pipeline can look for.  When it finds a mesh that has that Opaque Data custom processing can be done.  For the trigger, the code may remove the actual dummy mesh that was used and create a custom trigger that your game can understand.  I used this method about 10 years ago when I worked on a train simulator.  I didn't have a nice content pipeline to strip it out and had to do it at run time.

His networking talk was phenomenal.  Between this talk and a few from the XBOX LIVE track that I attended I learned that the goal for a game is to not send any more than 8kb of data per second.  It is extremely bad to send network data at the same rate as your frame rate.  Sending 60 packets a second is not a good thing.  In another talk they mentioned 15-20 packets per second was good.  Something that may not be immediately obvious is the fact that 8kb is not just game data.  It also includes the Xbox LIVE header information for the VDP packets (UDP with some encryption specific to Xbox LIVE).  It also includes all the voice data.  So if you have 16 players in a game and they all talk at the same time the 8kb is used up.  While this is acceptable in the Lobby, it isn't during the game play as no game play data will be sent.  So it is a good idea to limit who all hears each other.  Some ways to limit this is by proximity in the game world.  Only the players 'physically' close to each other can hear each other chat.  For some games, perhaps a way to accomplish this is by only allowing teammates to chat.  It was also mentioned that latency (the amount of time it takes for the player to actually receive the packet) is about 500 milliseconds (.5 seconds).  This is pretty significant.  So network prediction is really required.  This involves passing enough information to take an educated guess of where the object will be by the next time the next packet arrives.  A good example of this is on the creators club site in the Network Prediction sample.

Mitch Walker had a couple of talks as well.  I ended up writing the most with his talks as he had a lot of bullets in his power points.  He had a talk discussing what is new in 3.0.  The second talk was about creating great community games.  Both were very good.  I enjoyed going to all of the XNA Game Studio sessions.  The sessions were repeated the second day so I was able to hit a couple of other tracks.  Well, I went to one other track beside the Xbox LIVE track.  I attended two Casual Game sessions.  Both discussed Silverlight.  I enjoy working with Silverlight and was excited to see it being talked about.

Overall it was a very enjoyable conference.  I had a good time and learned some new things.  I met a couple of new people as well, so that is always good.

Good things are coming with XNA GS 3.0...

Happy Coding!

-Chad

Free 1 Year XNA Creators Club Subscription

Well technically it is a Trial subscription, but it allows you to deploy games to your Xbox 360.  This is not a premium subscription, so you won't be able to submit games to the current beta site (for XNA Game Studio 3.0 CTP) or review other's games and you won't be able to download premium content like the Ship starter kit.  But, being able to deploy a game to your Xbox 360 for free is definitely a good thing!

How do you get this free subscription?  Easy - just sign up to be a part of the Dream Build Play competition.  The competition is only for Xbox 360 games (this is why Microsoft is giving away the subscription trials).  The grand prize winner will get $40,000!  That is a nice chunk of change.  The winner may also get to sign a deal with Xbox LIVE Arcade much like some winners from last year's competition.

So don't just stand there ... get the free subscription while it is available and start working on your entry!

Happy Coding!

Chad